Microscope, Microscope Parts, Labeled Diagram, and Functions

  • Reading time:23 mins read

What is Microscope?

A microscope is a laboratory instrument used to examine objects that are too small to be seen by the naked eye. It is derived from Ancient Greek words and composed of mikrós, “small” and skopeîn,”to look” or “see”.

It is one of the most revolutionized scientific instruments used to observe or examine minute structures not clearly visible from naked eyes.

In 1665, for the first time Robert Hooke made an impressive Micrographic illustration using microscope. Antonie van Leeuwenhoek, another scientist made significant contribution in microscope research by magnifying the simple single lens microscope 300 times.

Structure of Microscope

Microscope Parts - Research Tweet 2

What Microscope does?

Microscopes magnify or enlarge small objects such as cells, microbes, bacteria, viruses, microorganisms etc. at a viewable scale for examination and analysis.

Microscopes consist of one or more magnification lenses to enlarge the image of the microscopic objects placed in the focal plane. The magnification power of simple laboratory microscope is 1250x.

Types of Microscope

There is various type of microscope such as transmission electron microscopes (TEMs), scanning electron microscopes (SEMs), atomic force microscopes (AFM), near-field scanning optical microscopes (MSOM or SNOM, scanning near-field optical microscopy, and scanning tunneling microscopes (STM).

However, the most common type of microscope is optical microscope.

Microscope Parts and Functions

Microscope PartsMicroscope Parts Functions
BaseSupports the microscope
ArmUsed to carry the microscope
StagePlatform where the slide with the specimen is placed
Stage ClipsHolds the slide in place on the stage
Eyepiece (containing ocular lens)Magnifies the image for the viewer
Revolving nose pieceContains the objective lenses; rotates to allow the user to switch between different objective lenses
Objective lensesLow-, medium-, and high-power lenses that further magnify the specimen at different intensities
Coarse adjustment knobLarge knob used for focusing the image under low power (general focusing)
Fine adjustment knobSmaller knob used for focusing the image with the medium- and high-power objectives (fine-tuning)
DiaphragmControls the amount of light that passes through the specimen
Light sourceProvides light for viewing the specimen
Microscope Parts and their Functions

In general, microscopes are made up of supporting parts to hold the structure of Microscopes and optical parts, consist of lenses used to magnify the specimens.

The description given below summarize the brief description of microscope parts used to visualize the microscopic specimens such as animal cells, plant cells, microbes, bacteria, viruses, microorganisms etc.

Microscope Parts - Research Tweet
The Microscopes parts divided into three different structural parts Head, Base, and Arms.

Head/Body: It contain the optical parts in the upper part of the microscope.

Arm: It supports the tube and connects it to the base.

Base: The bottom of the microscope, used for support.

Optical Components of Microscope

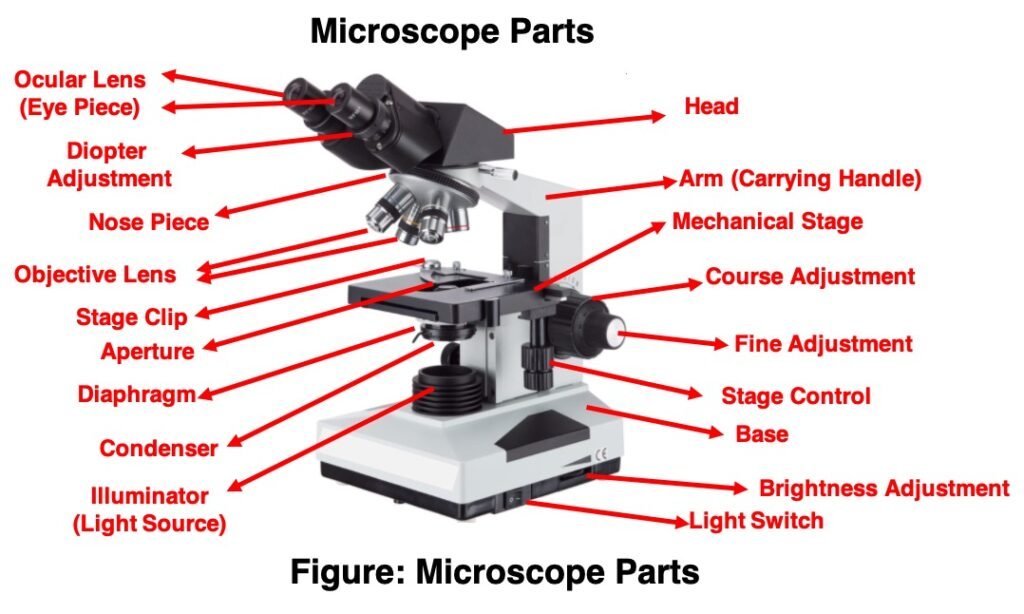
Eyepiece Lens: the lens at the top that you look through, usually 10x or 15x power.

Tube: Connects the eyepiece to the objective lenses.

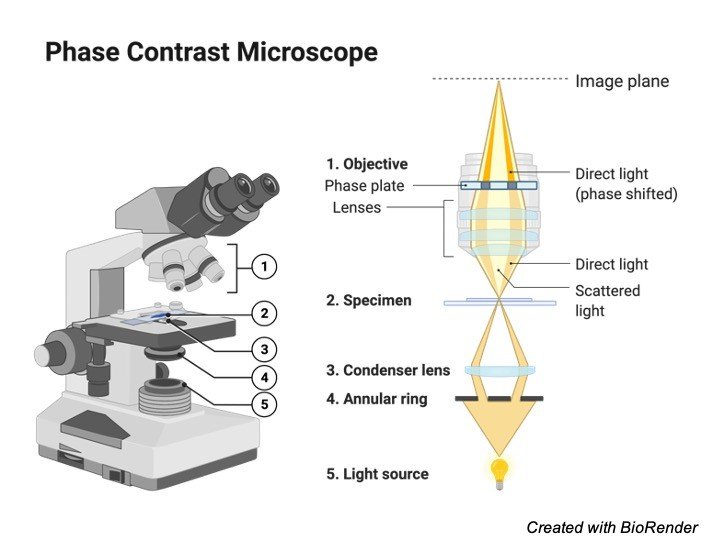
Illuminator: Illuminator is the most important microscope parts and it serve as light source for a microscope during slide specimen visualization. It is a continuous source of light (110 volts) used in place of a mirror. The mirror of microscope is used to reflect light from the external light source up through the bottom of the stage. Usually, the Illuminator located in the base of the microscope. Most light microscopes use low voltage, halogen bulbs with continuous variable lighting control located within the base.

Stage with Stage Clips: The stage of a microscope is a flat platform where you place your subject slides. Stage clips hold the slides in place. The mechanical stage of your microscope will help you to move the slide around by turning two knobs. One knobs moves it left and right, the other knobs moves it up and down.

Revolving Nosepiece or Turret: Turret is the part of the microscope that holds two or multiple objective lenses and helps to rotate objective lenses and also helps to easily change power.

Objective Lenses: Three are 3 or 4 objective lenses on a microscope. The objective lenses almost always consist of 4x, 10x, 40x and 100x powers. The most common eyepiece lens is 10x and when it coupled with others, total magnification is 40x (4x times 10x), 100x , 400x and 1000x. Objectives can be forward or rear-facing.

Microscope Rack Stop Rack Stop: Rack Stop is an important microscope parts that determines how close the objective lens can get to the slide. It keeps the students from damaging the high power objective lens down into the slide. If you cann’t able to focus on the specimen at high power while using very thin slides then slight adjustment helps you to adjust the focus.

Diaphragm or Iris: Most of the laboratory microscopes have a rotating disk under the stage known as diaphragm or iris. Iris Diaphragm controls the amount of light reaching the specimen. The Iris Diaphragm is located above the condenser lens and below the microscope stage.

The different sized holes in the diaphragm helps to vary the size of the cone and intensity of light that is projected upward into the slide. However, there is no set rule regarding which setting to use for a particular power.

The specimen transparency, degree of contrast and particular objective lens in use decide the Diaphragm or Iris setting. Majority of high quality microscopes used in laboratory include an Abbe condenser with an iris diaphragm. When iris diaphragm is combined with Abbe condenser, it control both the quantity of light applied as well as focus on the specimen.

Aperture: It is the hole in the stage through which the base (transmitted) light reaches the stage.

Condenser: Condenser lenses are used to collect and focus the light from the illuminator on to the specimen. Usually the Condenser lenses are located under the stage in conjunction with an iris diaphragm. Condenser lenses helps in ensuring clear and sharp images are produced with a high magnification of 400X and above.

Magnification power of the condenser is directly related to the image clarity. Most of the sophisticated microscopes in the laboratory come with an Abbe condenser that has a high magnification of about 1000X. Condenser Focus Knob moves the condenser up or down to control the lighting focus on the specimen.

FAQ About Microscope and Microscope Parts

What is Microscope?

Microscopes are instruments that are used in science laboratories, to visualize very minute objects such as cells, microorganisms, giving a contrasting image, that is magnified.

What is the Function of Microscope?

A microscope is usually used for the study of microscopic algae, fungi, and biological specimens.

What is Magnification?

Magnification is the process of maximizing object’s relative size rather than its physical size. This expansion is measured by a calculated number known as “magnification.” Whenever this number is less than one, it corresponds to a reduction in size, also known as minification or de-magnification.

What is Resolution?

The term ‘resolution’ in microscopy refers to a microscope’s ability to differentiate object’s details. In other words, this is the smallest distance at which two distinct points of a specimen can still be seen as separate entities – either by the observer or the microscope camera. A microscope’s resolution is inextricably linked to the numerical aperture (NA) of the optical components as well as the wavelength of light used to examine a specimen.

What is Depth of Field?

The depth of field is defined as the distance between the nearest and farthest object planes that are both in focus at any given moment. In microscopy, the depth of field is how far above and below the sample plane the objective lens and the specimen can be while remaining in perfect focus.

What is Eyepiece?

The eyepiece, also known as the ocular is the part used to look through the microscope. Its found at the top of the microscope. Its standard magnification is 10x with an optional eyepiece having magnifications from 5X – 30X.

What are Objective Lens?

Objective Lens are the major lenses used for specimen visualization. They have a magnification power of 40x-100x. There are about 1- 4 objective lenses placed on one microscope, in that some are rare facing and others face forward.

What is Coarse Adjustment?

The coarse adjustment knob moves the stage up and down to bring the specimen into focus.

What is Fine Adjustment?

The fine adjustment knob brings the specimen into sharp focus under low power and is used for all focusing when using high-power lenses.

What are Condensers Lenses?

Condensers are lenses that are used to collect and focus light from the illuminator into the specimen. They are found under the stage next to the diaphragm of the microscope. They play a major role in ensuring clear sharp images are produced with a high magnification of 400X and above.

What are Abbe Condenser Lenses?

Abbe condenser is a condenser specially designed on high-quality microscopes, which makes the condenser to be movable and allows very high magnification of above 400X. High-quality microscopes normally have a high numerical aperture than objective lenses.

Can I See Germs Under a Microscope?

Due to very small size of germs, an amateur microscope will not allow you to see germs. Germs can only be observed under a microscope with a magnification of at least 1200x. In order to visualize the germs, and the specimen must be stained.

As a result, you’ll need to use a powerful microscope model and special sample preparation techniques. Of course, there are giants among bacteria that can be seen at 900x magnification, but they live at the deepest depths of the ocean and are nearly impossible to obtain.

Can a Light (Optical) Microscope Detect Viruses?

No, they are 1000 times smaller than bacteria, which is the smallest thing an optical microscope can see.

What is Microscopy Staining?

Cell staining is a technique used to enhance the visibility of cells and cell components under a microscope. Different stains can be used to stain specific cell components, such as the nucleus or the cell wall, or the entire cell with different colours.

What are Basic Components of Optical Microscope?

Almost all optical microscopes have a tube, an eyepiece lens, a turret with one or more objective lenses, a light source, an aperture, a condenser, a stage, fine and coarse focus controls, and a stable base.

What is Microscopy in Biology?

In biology, the most important way to gain insight into biological structures and processes is through microscopy, or studying biological forms with an optical microscope.

Why is it Necessary to Begin with 4x Magnification on a Microscope?

The 4x objective lens has the least amount of power and thus the greatest field of view. As a result, locating the specimen on the slide is easier than if you start with a higher power objective.

How to Calculate Magnification of a Microscope?

Simply multiply the magnification of the ocular lens by the magnification of the objective lens to calculate the power of magnification of a microscope. For a typical compound microscope with a 10X ocular lens and objective lenses with magnifications of 4X, 10X, 40X, and 100X, your microscope will have magnifications of 40X, 100X, 400X, and 1000X depending on which objective lens you use. The same principle applies to stereo microscopes; a 10X eyepiece combined with a 4X objective lens produces a magnification of 40X.

Some stereo microscopes have a continuous zoom objective lens with magnification ranging from 0.75X to 7.5X. When combined with a 10X ocular lens, the total magnification will be 7.5X to 75X. When combined with a 25X ocular lens, the total magnification will be 18.75X to 187.5X.

What is Field of View (FOV)?

When looking through a microscope, the FOV is the diameter of the circle of light that you see. The field of view shrinks as magnification power increases, and vice versa.

How Does the Diopter Adjustment Work?"

To compensate for the difference in vision between your two eyes, the diopter adjustment allows you to focus one eyepiece independently of the other. When the diopter adjustment is correct, both eyes are at ease during observations.

How do Achromatic, Plan Achromatic, Semi-Apochromatic, and Apochromatic Objectives Differ?

The main distinction between microscope objectives is in their design, image quality, as well as research methods.

Spherical and chromatic aberrations are reduced in achromatic objectives. This objective type has a flat field of focus in the centre of the 65 percent field of view. The delivered image may have a hint of blue-red.

Color aberrations can be corrected by planning achromatic objectives. They flatten the field of view to provide a very sharp image across the entire image. These macro objective lenses are fantastic for close-up photography.

The image quality of semi-apochromatic objectives is average (in comparison to achromatic and plan achromatic objectives). These objectives’ optical elements contain fluorite, allowing them to be used in fluorescence microscopy.

Apochromatic objectives (as opposed to achromatic objectives) produce a sharper image with more vibrant colours. This is accomplished by enlarging the spectral region.

How to Calculate Total Magnification?

Magnification refers to how much larger an object appears when viewed through a microscope versus the naked eye. The multiplication symbol (X) on the eye piece and objective lenses indicates how many times the lens of each microscope part magnifies an object.

Multiply the magnification of the eyepiece (ocular lens) by the magnification of the objective lens in use to calculate the total magnification of any object viewed under the microscope. This can be demonstrated using the formula.

Total magnification = ocular lens x objective lens

For example, if the ocular lens magnifies the image 4X and the low-power objective lens magnifies the image 10X, the total magnification of the object at low magnification is 40X (4×10=40X). The total magnification would be 160X (4 x 40= 160X) with the same ocular lens and a high – power objective that magnifies 40X.

How to Focus Your Microscope?

The proper way to focus a microscope is to start with the lowest power objective lens and crank the lens down as close to the specimen as possible without touching it while looking from the eye piece.

Examine the image through the eyepiece lens and focus only upward until it is sharp.

If you can’t get it to focus, go through the process again. Once the image with the low power lens is sharp, you should be able to simply click in the next power lens and make minor adjustments with the fine adjustment knob.

If your microscope has a fine focus adjustment, a slight turn should suffice. Continue with the next objective lens, fine-tuning the focus each time.

When looking through the microscope, keep both eyes open. This reduces eye fatigue caused by keeping the nonviewing eye closed.

It takes some practice to keep both eyes open, but it is highly recommended. Also, never let your eye come into contact with the ocular lens. You are too close if your eyelashes touch the lens.

When using a microscope, always remove your glasses. If your eyeglass lens comes into contact with the microscope, it may be scratched.

What is the Best Way to Use a Microscope?

• Step 1: Connect the light microscope to a power source in step one. You can skip this step if your microscope has a mirror instead of an illuminator. Instead, look for a location with plenty of natural light.

• Step 2: Rotate the revolving nosepiece so that the lowest objective lens is in place.

• Step 3: Install your specimen on the stage. But first, make sure your specimen is adequately protected by placing a coverslip on top of it.

• Step 4: Use the metal clips to secure your slide. Make sure the specimen is in the centre, directly beneath the lowest objective lens.

• Step 5: Looking through the eyepiece, slowly turn the coarse adjustment knob to bring your specimen into focus. Make sure the slide does not come into contact with the lens.

• Step 6: Set the condenser to produce the most light possible. Because you’re using a low power objective, you may need to reduce the illumination. To make adjustments, use the diaphragm beneath the stage.

• Step 7: Slowly turn the fine adjustment knob until you have a clearer image of your specimen.

• Step 8: Inspect your specimen.

• Step 9: Once you’ve finished viewing with the low-power objective, switch to the medium-power objective and re-adjust the focus with the fine adjustment knob.

• Step 10: Once you’ve focused the low-power objective, move on to the high-power objective.

Safety Precautions for Using Microscopes

Carrying: Carry your microscope with two hands, one grasping the arm or back slot and the other supporting the base.

Table Placement: Position the microscope on flat, solid support that will not be easily knocked off. To avoid tripping over the cord, coil it.

Cleaning: Lenses must be clean in order for resolution to be achieved. Only lens paper or gauze and cleaning solution should be used. Never clean your lenses with your finger, handkerchief, paper towels, or spit. Remove no parts for cleaning; doing so allows dust to enter the microscope.

Electron Microscopes vs Light Microscopes

FeatureLight MicroscopeElectron Microscope
SizeSmallVery large
Training requiredLittle; suitable for middle-school students as well as olderExtensive training necessary: only laboratory personnel in research institutions will have access
Viewing live specimensLive specimens can be viewedLive specimens cannot be viewed
Can see in color?Yes, since light is used to illuminate the specimenNo, because electrons are used to generate an image. Any colors seen are computer-generated for clarity
Total magnification1000X maximumup to around 10,000,000X (some can view atoms)
Clarity/resolutionVague; generally poor resolutionVery clear; very high resolution and clarity

MCQ on Microscopy

1. What is the overall magnification of a light microscope if the eyepiece magnification is x10 and the objective magnification is x40?

a) x10

b) x40

c) x400

d) x4

2. What is the purpose of the condenser on a light microscope?

a) To focus the light source

b) To diffuse the light source

c) To provide the light source

d) To control the light source

3. What is the proper name for the microscope lens in the eyepiece?

a) Ocular

b) Binocular

c) Objective

d) Condenser

4. What is the proper name for the primary microscope lens that focuses the image?

a) Ocular

b) Binocular

c) Objective

d) Condenser

Microscope Slide Preparation

Microscope slides are pieces of clear glass or plastic that hold a sample and allow it to be viewed through a light microscope. Because there are various types of microscopes and samples, there is more than one way of preparing a microscope slide.

i. Wet Mount Slide

Wet mounts are used for living samples, clear liquids, and aquatic samples. A wet mount is similar to a sandwich. The slide is the bottom layer. The liquid sample comes next. To minimise evaporation and protect the microscope lens from sample exposure, a small square of clear glass or plastic (a coverslip) is placed on top of the liquid.

1. Collect a clean microscope slide and a coverslip (a thin piece of plastic covering). Fill the centre of the microscope slide with a drop or two of water.

2. Submerge the specimen in a drop of water.

3. Grab the coverslip by the edges. Do not touch the coverslip’s surface. Place the coverslip on its edge alongside the drop of water. Allow the water drop to run along the edge of the coverslip. This will assist in preventing air bubbles from forming beneath the coverslip.

4. Gently lower the coverslip over the water drop and specimen.

5. Ensure that the object is completely submerged in water. If not, remove the coverslip, add a little more water, and replace it.

6. If excess water seeps out from underneath the coverslip, gently blot it away with a small piece of paper towel.

7. The slide is now ready to be viewed. When you’re finished viewing, properly dispose of the specimen and clean the slide and coverslip as directed by your teacher.

ii. Dry Mounting

Dry mount slides can be made up of either a sample placed on a slide or a sample covered with a coverslip. The size of the object isn’t important for a low-power microscope, such as a dissection scope, because its surface will be examined.

1. Lay the slide down on a flat surface.

2. Place the sample on the slide with tweezers or forceps.

3. Place the sample on top of the coverslip. In some cases, viewing the sample without a coverslip is acceptable, as long as care is taken not to bump the sample into the microscope lens. If the sample is soft, create a “squash slide” by gently pressing down on the coverslip.

iii. Blood Smear Slide

1. On a flat surface, place a clean glass slide. One small drop of blood should be added to one end.

2. Take another clean slide and, holding at a 45-degree angle, touch the blood with one end of the slide, allowing the blood to run along the edge of the slide via capillary action. To make a thin smear of blood, carefully push along the length of the first slide.

3. Make two smears, let them air dry, and label them clearly. Place the dried slides in the slide transport containers provided.

v. Staining Slides

1. Microscope cell staining is a technique used to improve the visibility of cells and cell parts under a microscope. A nucleus or a cell wall can be seen more clearly by using different stains.

2. Iodine, crystal violet, and methylene blue are examples of simple stains.

3. Make a wet or dry mount with a coverslip.

4. Apply a small amount of stain to the coverslip’s edge.

5. Place the opposite edge of the coverslip with a tissue or paper towel. To stain the specimen, capillary action will pull the dye across the slide.

Typical Microscope Examinable Objects

Many everyday foods and objects make fascinating slide subjects. Food slides should be wet mount. Dry mount slides are ideal for use with dry chemicals. The following are some examples of appropriate subjects:

• Table salt

• Epsom Salt

• Alum

• Dishwashing detergent powder

• Sugar

• Mold from bread or fruit

• Thin slices of fruits or vegetables

• Human or pet hair • Pond water

• Garden soil (as a wet mount)

• Yogurt

• Dust

Microscope Citations:

Share

Similar Post:

This Post Has 10 Comments

  1. Mike

    Wonderful article!

    1. maria

      ya

    1. cole

      we love you i love how you made up for your sons mistakes thanks

      1. Joe

        nice

  2. ritchird

    i realy love this website sory for the last comment it was made by my son!!!!

  3. ritchird

    qwerty is the keybod word spelt out!!!!

  4. Josh

    The article is real good

  5. ur mom

    this article is very kewt! uwu

  6. maria

    hi i just need help with 1 thing

Leave a Reply